How to Stain a Wood Fence with a Roller
Sam Lutz • July 8, 2014
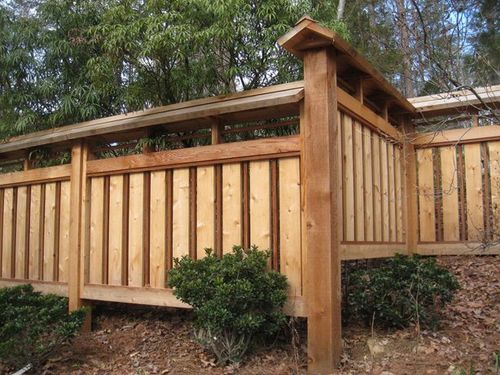
Depending on the type of stain you use, your wooden fence may need to be re-stained every two to four years. Compared to paintbrushes, rollers have the advantage of being faster and easier to use. For the right fence, using rollers makes a lot of sense.
A Word About Materials
Rollers
You’ll want more than one roller to complete this job. Use a 9-inch roller to cover large areas, and a smaller 4-inch roller to stain the nooks and crannies.
Consider the nap of the roller as you’re trying to purchase the right rollers right for this project. Rougher fences will need rollers with deeper naps, in order to get the best coverage. For a highly textured fence, you’ll want the biggest nap possible. When in doubt, speak with a paint professional about the type of roller for your fence.
For a tall fence, a long-handled roller will help you cover areas that would otherwise be difficult to reach.
Paintbrushes
In some cases, you’ll want a paintbrush to smooth the stain and reach the deepest crevices of the fence. Keep a 1 inch paintbrush and larger 3 inch paintbrush on hand.
Other Useful Materials:
- Tarp
- Paint Tray
- Rags
- Paint Stirrer
The Process
- Wash the fence with a power washer to remove dirt and grit, and give the fence time to dry.
- Lay down a tarp in the area where you’ll be staining the fence.
- Shake the can of stain, then open the can and stir it thoroughly.
- Pour the stain into the paint tray and dip the larger roller into the stain.
- Use the roller to cover the fence with stain.
- Investigate your work so far and use a paintbrush to smooth any areas that have uneven coverage. Look for areas where the stain may have dripped or dribbled on the fence. Smooth these areas before they are allowed to dry. Thick drips that dry on the fence may have a tacky, shiny quality that will stand out later, and may be difficult to cover.
- Use the smaller roller to cut-in narrow areas of the fence.
- Wait for the fence to dry and then apply a second coat.
Troubleshooting
Fences are very textured, nuanced surfaces. If your roller isn’t reaching all the deep crevices on your fence, you may need a roller with a deeper nap.
Alternative Methods
Paint rollers aren’t the only way to stain a fence.
Paintbrushes
often provide adequate, even coverage, but at a slow pace. If you’re doing this alone or have limited time to complete your project, you may look into using a paint sprayer. Paint sprayers provide quick coverage with relative ease. However, paint sprayers
can clog if not properly used, and can create an unpleasant mist that leaves a smell and taste in the air.
In this guide to staining a fence, author Peter A. Kirsch-Korff recommends using a disposable paint filter to strain the stain before placing it in the sprayer. Use a respirator to prevent yourself from breathing the fumes in the air while working with a paint sprayer.
Resources
Essortment posted an excellent tutorial video about staining a fence with a roller which we’ve provided for you below:
Family Handyman also provides a very thorough tutorial
about staining and maintaining a wooden fence using a roller and paintbrush. It also provides advice on power-washing.
Finally, you can take your questions about stains and painting materials to Ace Paints. Our friendly and helpful staff are always happy to answer your questions.

There are all kinds of wooden furniture: modern, antique and everything in between. We’ve talked about style differences, but what about how it’s made and what it’s made of? Is there a large difference between the wood furniture of today and yesterday?

Colors are so fascinating. They make us feel, they help us express how we feel. The right colors can really set the mood in a room, or on an outfit. There’s a lot to color theory and what each of the colors mean. This St. Patrick’s Day we thought it’d be fun to explore a little about green.

One of the wonderful things about good wood furniture is that it doesn’t have to be merely functional. It can be beautiful as well. We’ve seen some amazing pieces made with wood stains that are more than just furniture, they’re works of art. So if you’ve got an old table, desk or other piece of wood furniture that needs jazzed up, why don’t you consider using some of our great stains to try one of these ideas.

What's your furniture style? Here’s a few of the more popular styles and the kind of look they give your home.

Wood is our most basic raw material used for creating furniture. Wood furniture is timeless, and the aesthetic options are endless. Let’s talk about a few today, shall we?

The 2010s saw an uptick in modern interiors, bringing in clean lines to decor and furniture, so what does the new decade have in store? Restyle your home for the new year with the latest trends.

Are they bright and bold? Wild and wacky? It’s a thrill for our industry to learn what the latest “in” colors will be each year, and they never disappoint. The color trends for 2020 include shades of green, blue and pink, and each have an inherent welcoming quality.

Holiday parties are part of the magic of the season, but the cleanup is a pain—especially when furniture is involved. Prevent disasters with a few tips on how to protect your furniture during holiday parties.

The holiday season has arrived, and soon every corner will be decked out in red and green. But have you ever stopped to think about what holiday colors mean?

Restaining an old piece of furniture with a new varnish color can go a long way, but first you need to remove the old stain color.