Install A Tile Kitchen Backsplash
Sam Lutz • September 8, 2015
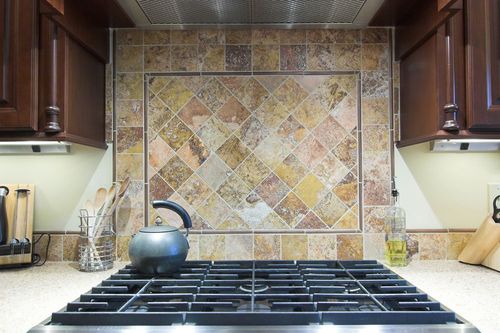
If you’re looking for a great way to add some style to your kitchen, installing a tile backsplash is a great way to go about it. If you’re not sure you can manage a tile job, we’ll give you some great tips to get around the harder parts of the job. Here’s what you’ll need:
Materials
- Tile. If you’re worried about spacing the tiles correctly, pick up tiles that are already attached to a backing mesh for easier installation.
- Spacers, if you’re using tile that isn’t attached to a backing mesh.
- Unsanded powdered grout in a color of your choice. If you’re worried about staining, pick up a sealer and don’t get light-colored grout.
- Tile mastic. If you want an easier installation process, pick up Adhesive Bonders sheets, which basically allow you to stick the tiles to the wall.
- Silicone caulk intended for wet areas.
Process
- Measure your backsplash’s length, then measure to ensure your tile row will have at least a half tile at each end of the backsplash, even if it means cutting an extra piece or leaving a gap at the wall edge. Then measure to determine the height of the backsplash. Lay out your tiles on the counter where they’ll need to be installed, then mark the wall in three-foot sections to make applying the mastic easier, essentially the adhesive that attaches the tile to the wall. If you’re taking off outlet or switch covers, shut off the breaker and test the switches and outlets before you remove the covers.
- If you are working with outlets and switches, measure from the wall edge to determine the location and cut openings as needed in the tile layout. Put painter’s tape along the countertop where you’ll install the tile backsplash. Using your wall marks, apply tile mastic to the wall for that three feet of tile using a toothed trowel. If you’re using Adhesive Bonders, apply them to the first three feet. Put cardboard spacers flat on the countertop with edges against the wall to prevent the tile from being set too far down.
- Put your first three feet of tiles into place, aligning them to the edge of the wall and the cardboard spacers and then pushing them into the mastic or adhesive. If you’re making more than one row, start at the bottom. Remember to space them uniformly between tile sheets to the same distance between the individual tiles. Once the tile is in place, put the block of wood over it, tapping the block to set the tiles, moving across the surface so the tiles are level to the touch. Continue applying the tile across the backsplash and allow to dry.
- Apply the grout using the grout float, pressing the grout between the tiles, working about three square feet at a time. When the grout starts forming a haze on the tiles, use a moist sponge to wipe the excess away, washing out the sponge regularly. If you let it go too long, you won’t be able to clean it off easily. Before it dries completely, polish off any remaining haze with a soft, dry rag, then slide the cardboard spacer between the tiles and the countertop. Apply a bead of caulk in that space. After two weeks, apply a grout sealer. You’ll need to reapply the sealer annually.
Now that you’ve had a chance to look at your options, it’s time to get started. At Ace Paints, we’re always happy to help with your DIY needs by providing quality and experience for your project. Please contact us
today with any questions about how we can help make your DIY experience even better.

There are all kinds of wooden furniture: modern, antique and everything in between. We’ve talked about style differences, but what about how it’s made and what it’s made of? Is there a large difference between the wood furniture of today and yesterday?

Colors are so fascinating. They make us feel, they help us express how we feel. The right colors can really set the mood in a room, or on an outfit. There’s a lot to color theory and what each of the colors mean. This St. Patrick’s Day we thought it’d be fun to explore a little about green.

One of the wonderful things about good wood furniture is that it doesn’t have to be merely functional. It can be beautiful as well. We’ve seen some amazing pieces made with wood stains that are more than just furniture, they’re works of art. So if you’ve got an old table, desk or other piece of wood furniture that needs jazzed up, why don’t you consider using some of our great stains to try one of these ideas.

What's your furniture style? Here’s a few of the more popular styles and the kind of look they give your home.

Wood is our most basic raw material used for creating furniture. Wood furniture is timeless, and the aesthetic options are endless. Let’s talk about a few today, shall we?

The 2010s saw an uptick in modern interiors, bringing in clean lines to decor and furniture, so what does the new decade have in store? Restyle your home for the new year with the latest trends.

Are they bright and bold? Wild and wacky? It’s a thrill for our industry to learn what the latest “in” colors will be each year, and they never disappoint. The color trends for 2020 include shades of green, blue and pink, and each have an inherent welcoming quality.

Holiday parties are part of the magic of the season, but the cleanup is a pain—especially when furniture is involved. Prevent disasters with a few tips on how to protect your furniture during holiday parties.

The holiday season has arrived, and soon every corner will be decked out in red and green. But have you ever stopped to think about what holiday colors mean?

Restaining an old piece of furniture with a new varnish color can go a long way, but first you need to remove the old stain color.