Paint A Refrigerator With Liquid Stainless Steel
Sam Lutz • February 24, 2015
Stainless steel has become a popular appliance material in the last several years, but unfortunately, many kitchens don't have stainless steel appliances. Homeowners who own appliances of other colors are disinclined to purchase stainless steel appliances because they don't want their appliances to be mismatched. Fortunately, there's a solution to this now.
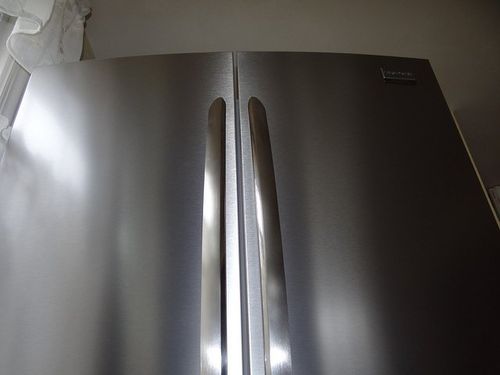
Liquid stainless steel is a paint product made from tiny pieces of stainless steel mixed in an automotive-grade polymer. Properly applied, liquid stainless steel is tough and attractive. Many companies sell kits that provide everything you need in order to paint your refrigerator. These tips will help you apply liquid stainless steel to your refrigerator at home.
Materials:
- Tarp
- Blue Painter's Tape
- Magnet
- Screwdriver
- Grease Remover
- Rag
- Primer
- Liquid Stainless Steel Paint Kit
Process:
- Lay the tarp down on the floor beneath your refrigerator.
- Use blue painter's tape to mask any areas around the refrigerator that you don't wish to cover in paint.
- Use a magnet to check your refrigerator for any non-metal panels. Any parts that aren't metal will not hold a magnet. Although the handles are likely made of plastic, the refrigerator body is probably made of metal.
- Remove the handles of the refrigerator with a screwdriver.
- Use grease remover and a rag to clean the entire refrigerator, including the top and the sides of the refrigerator.
- Prime the plastic handles and other plastic parts of the refrigerator. Note that the type of primer you use may be dictated by the company that makes your liquid stainless steel. Check the manufacturer recommendations for the specific type of primer to use.
- Allow the primer to dry for the manufacturer's recommended length of time.
- Crack the door of the refrigerator. You'll want to keep the door cracked for the entire time that the refrigerator is being painted and the liquid stainless steel is drying.
- Apply the first coat of liquid steel on all parts of the refrigerator, starting with the top of the refrigerator, then the sides and the front. You may paint the sides of the rubber gasket around the edges of your refrigerator door opening, but not the front of the gasket. Note that the first coat may appear to be very thin, but subsequent coats will cover any bare patches that show through the paint. Paint the refrigerator using bottom-to-top brushstrokes.
- Apply the second coat of liquid stainless steel, and then the third coat of liquid stainless steel, if recommended by the manufacturer. Wait the length of time recommended by the manufacturer between coats.
- Cover the liquid stainless steel with the topcoat provided by the manufacturer.
- Wait for everything to dry, then remove the painter's tape in the area you didn't paint.
That's it! It's a relatively easy process, and a lot cheaper than buying a stainless steel refrigerator. For more information about painting your refrigerator with liquid stainless steel, check out this tutorial
and the online video below:
You may also want to check out this review
written by a DIYer who painted their own refrigerator. If you live in the Pittsburgh area, we also encourage you to stop by Ace Paint and Unfinished Furniture
for your liquid stainless steel kit and the other materials you'll need to paint your refrigerator. We're looking forward to seeing you in our store!

There are all kinds of wooden furniture: modern, antique and everything in between. We’ve talked about style differences, but what about how it’s made and what it’s made of? Is there a large difference between the wood furniture of today and yesterday?

Colors are so fascinating. They make us feel, they help us express how we feel. The right colors can really set the mood in a room, or on an outfit. There’s a lot to color theory and what each of the colors mean. This St. Patrick’s Day we thought it’d be fun to explore a little about green.

One of the wonderful things about good wood furniture is that it doesn’t have to be merely functional. It can be beautiful as well. We’ve seen some amazing pieces made with wood stains that are more than just furniture, they’re works of art. So if you’ve got an old table, desk or other piece of wood furniture that needs jazzed up, why don’t you consider using some of our great stains to try one of these ideas.

What's your furniture style? Here’s a few of the more popular styles and the kind of look they give your home.

Wood is our most basic raw material used for creating furniture. Wood furniture is timeless, and the aesthetic options are endless. Let’s talk about a few today, shall we?

The 2010s saw an uptick in modern interiors, bringing in clean lines to decor and furniture, so what does the new decade have in store? Restyle your home for the new year with the latest trends.

Are they bright and bold? Wild and wacky? It’s a thrill for our industry to learn what the latest “in” colors will be each year, and they never disappoint. The color trends for 2020 include shades of green, blue and pink, and each have an inherent welcoming quality.

Holiday parties are part of the magic of the season, but the cleanup is a pain—especially when furniture is involved. Prevent disasters with a few tips on how to protect your furniture during holiday parties.

The holiday season has arrived, and soon every corner will be decked out in red and green. But have you ever stopped to think about what holiday colors mean?

Restaining an old piece of furniture with a new varnish color can go a long way, but first you need to remove the old stain color.